Introduction to Swift Keypaths
Keypaths allow type-safe abstractions over properties that go beyond what can be done with protocols alone. This guide introduces by solving practical problems
KeyPaths in Swift
Lets talk KeyPaths. Modern KeyPaths. Swift KeyPaths. Not Objective-C's valueForKeyPath: @"controller.property".
These particular, modern, swifty, keypaths were added with Swift 4.2. They differ from the old Objective-C ones by being type-safe and composable.
Not everyone is aware of the useful functionality that Swift's new keypaths offer. They're a great addition to your toolbelt because they allow you to find abstractions for problems where protocols alone are not sufficient.
This guide will first introduce Swift's KeyPaths, then discuss the underlying theory, showcase their usefulness with practical examples, and finally list tips and tricks for applying them in daily work.
Lets start with a very basic introduction.
KeyPaths 101
We will start with a very, very simple example. Below, we create a User type that has just one property, the username. Then, we initialize the user as firstUser and want to print out firstUsers username.
Normally, we would do print(firstUser.username) but instead we're doing something else. Have a look:
struct User {

   var username: String

}


let firstUser = User(username: \"Player 1\")


print(firstUser[keyPath: \User.username])
You'll easily see the difference. Instead of using firstUser.username we're using a very weird syntax:
firstUser[keyPath: \User.username]
This tells Swift that we want to access the contents of the property username of the type User on the instance firstUser.
It is comparable to dictionary access (dict["Hello"]), only that you don't use String keys ("Hello") but something type-safe. Namely, a Swift keypath.
At first glance, this looks like an overly verbose version of direct access, so what else can it do? For one, we can abstract the access away. We can store the KeyPath in a variable:
let userKeyPath = \User.username


print(firstUser[keyPath: userKeyPath])
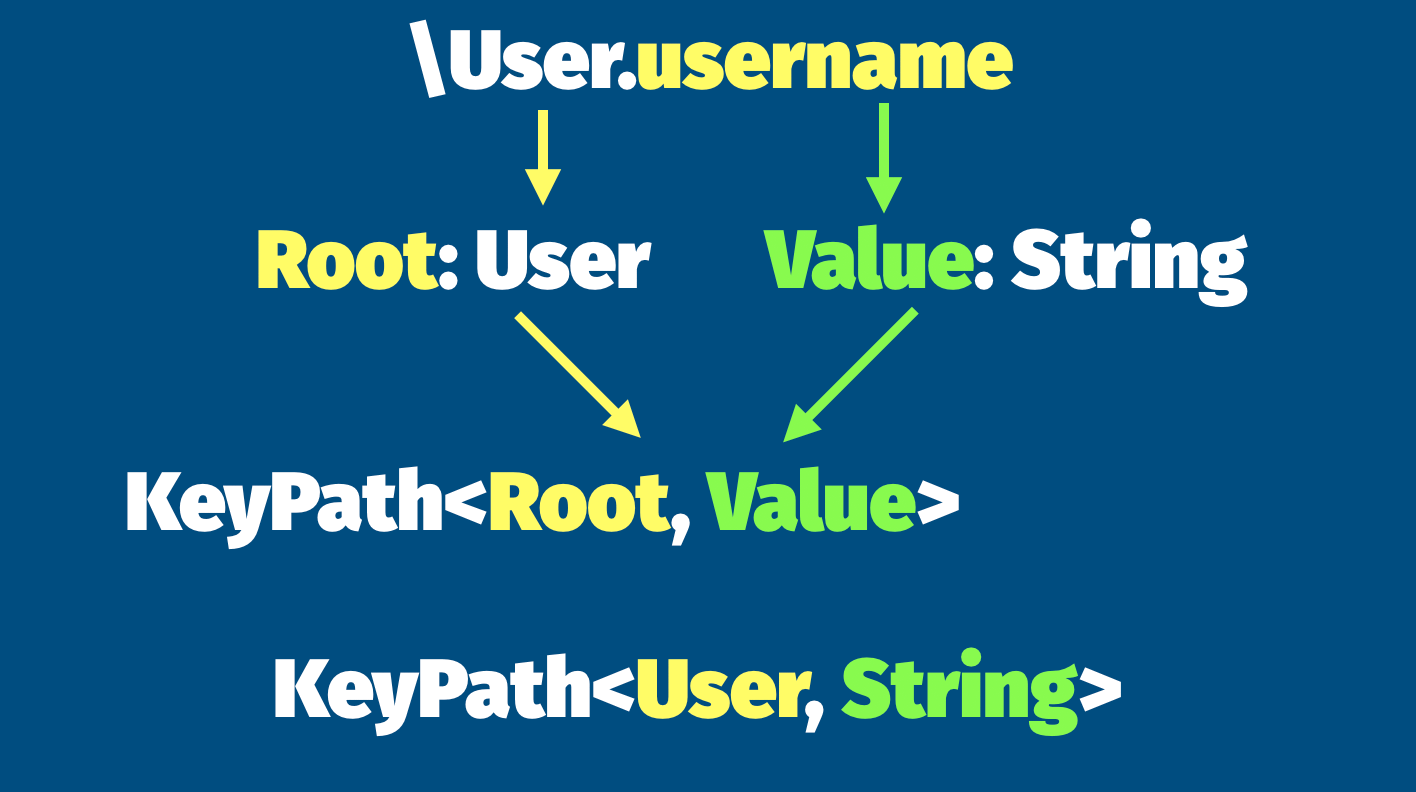
By doing so, we implement generic abstraction between the property and the type. But, what is the type of this userKeyPath variable? The full type signature looks like this:
let keyPath: KeyPath<User, String> = \User.username
KeyPath has two generic types:
- The
Root. It is thestruct,class, orenumwhose property you want to have aKeyPathto. APerson, aUIViewController, aString, or something else - This is the
Value. It is a property on theRoottype. For example aPerson'sname, or aUIViewController'stitle, or aString'scount.
So in our example, the Root is User, and the Value is String because username is of type String. Here is an overview.
Nesting
Obviously, you can also nest KeyPaths. Now, our User also has an address:
struct Address {

   var street: String

}


struct User {

   var username: String

   var address: Address

}
If we want to create a keypath to the amount of characters of the street of the user's address, we can simply do that like this:
let keyPath: KeyPath<User, Int> = \User.address.street.count
As you can see, this is a KeyPath from User to Int because it points from the User to his address' street' count. count, finally, is a Int type.
Generic Types
We don't always have to spell out the two generic types Root and Value. We can, for example, write a generic function that works for any object with any property:
func accept<MyRoot, MyValue>(_ object: MyRoot, keyPath: KeyPath<MyRoot, MyValue>) {

   print(object[keyPath: keyPath])

}
Here, we introduce the generic types MyRoot and MyValue specifically for our accept function and also use them for our KeyPath<MyRoot, MyValue> definition. Now, we can use this function for different keypaths:
accept(user, keyPath: \User.username)

accept(\"\", keyPath: \String.count)
Types of KeyPaths
We've already met our new friend, the KeyPath. However, the KeyPath will not be the only friend we meet in this guide. There're a couple more KeyPath types and they're core to what makes keypaths so very very useful. So without further ado, here they are.
KeyPath<Root, Value>
We've seen this KeyPath before. What we did not really talk about yet is that this KeyPath is read only. You can't use it to modify properties, only to read properties. They're automatically used for accessing immutable properties or instances. Here're a couple of examples of these read-only keypaths:
struct ImmutableUser {

   // `let` properties are immutable

   let username: String

}

var firstUser = ImmutableUser(username: \"Shinji\")


// This will fail

firstUser[keyPath: \ImmutableUser.username] = \"Ikari\"


// Prints: KeyPath<ImmutableUser, String>

print(type(of: \ImmutableUser.username))
In this example, we could not edit the firstUser, because the username property was a let it was immutable. Just like firstUser.username = "Ikari" also would not have worked.
struct MutableUser {

   var username: String

}

var firstUser = MutableUser(username: \"Shinji\")


// This will work fine

firstUser[keyPath: \MutableUser.username] = \"Ikari\"
Here, it works fine, because
firstUseris avartypeMutableUser.usernameis avartype
So, if KeyPath is read-only and in this second example we could actually write to firstUser, then what is the type of \MutableUser.username here?
WritableKeyPath<Root, Value>
In the earlier example, our type was a WritableKeyPath. WritableKeyPaths are, as the name implies, keypaths that allow you to write information. They're formed for var properties on var instances.
struct MutableUser {

   var username: String

}

var firstUser = MutableUser(username: \"Shinji\")


firstUser[keyPath: \MutableUser.username] = \"Ikari\"
If you want to have a keypath argument to a function that allows mutating the contents, WritableKeyPath is a good choice:
func modify(user: User, keyPath: WritableKeyPath<User, String>) {

   user[keyPath: keyPath] = \"Hello World\"

}
There's another variant of the WritableKeyPath, which we will introduce next.
ReferenceWritableKeyPath
In the previous example code, we always defined User struct instances. Which meant that the actual instance we instantiated also had to be mutable (var):
var firstUser = User(username: String)

firstUser[keyPath: \User.username] = \"Ok\"
If this had be a let firstUser, it would not have worked, because let instances are immutable. However, if our User is a class type, we could still mutate it just fine:
class User {

   var username: String = \"Nothing\"

}

let firstUser = User()

// This works

firstUser[keyPath: \User.username] = \"Something\"
in The example above, the username property can still be modified because User is a class. Swift distinguishes between keypaths for reference (class) types and value types. Keypaths to reference types are of the type ReferenceWritableKeyPath<Root, Value>.
It is important to note that ReferenceWritableKeyPaths are subclasses of WritableKeyPath, so any function that accepts a WritableKeyPath can also accept a ReferenceWritableKeyPath.
The next KeyPath we want to look at is the PartialKeyPath, however, before we do so, we'll have a detour and look at a short example to better understand the need for it and to see some of what we've seen so far in action.
DebugPrinter Intermezzo
Now that we have our writable KeyPath types, we'd like to introduce a type that allows us to define the logging behaviour of an object. We'd like to define which properties should be printed when our debug print function is called. It will be a very simple example.
We will actually start by looking at how we would invoke the code before we write it. This will make it easier to understand what is going on here. The class we will define is called DebugPrinter and it is used to dynamically change how to debug print and object at runtime.
Say, if you will, that you're working on a Presentation app (aka something like Keynote). You have one structure that represents the current state of a presentation.
class Presentation {

   class Slide {

     var name: String

     var number: Int

     var template: Template

     var backgroundColor: UIColor

     var content: String

     var leftImage: UIImage?

     var rightImage: UIImage?

   }

   var currentSlide: Slide

   var currentSlideIndex: Int

   var slides: [Slide]

   var title: String

   var startedPresenting: Date?

   var isAnimating: Bool

}
Now, you'd like to define at runtime which of the properties of this type to print. For example depending on whether a user is currently presenting or editing slides. This is, how we would do that:
let state = Presentation(...) // we need a presentation instance

let printer = DebugPrinter(\"State\", for: state)

printer.addLog(\Presentation.currentSlideIndex, prefix: \"Current\")

printer.addLog(\Presentation.isAnimating)

printer.addLog(\Presentation.currentSlide.name)

printer.addLog(\Presentation.currentSlide.leftImage)


printer.log()
So here, we first create a printer that holds a reference to our state (an instance of our Presentation). Next, we define which parts of the animation we want to print (including an optional prefix). Here, we want to print, for example, the current slide, whether we're currently animating, the name of the current slide and, finally, the optional image of the current slide.
So, how would we implement this DebugPrinter? here is the code.
/// Dynamically define a debug description for an object

class DebugPrinter<T> where T: AnyObject {

     /// 1

     var keyPaths: [(String?, KeyPath<T, String>)] = []

     let reference: T

     let prefix: String


     /// 2

     init(_ prefixString: String, for instance: T) {

         reference = instance

         prefix = prefixString

     }


     /// 3

     func addLog(_ path: KeyPath<T, String>, prefix: String? = nil) {

         keyPaths.append((prefix, path))

     }


     /// 4

     func log() {

         print(prefix, terminator: \": \")

         for entry in keyPaths {

           if let prefix = entry.0 { print(prefix, terminator: \"\") }

           print(reference[keyPath: entry.1], terminator: \", \")

         }

     }

}
So lets go through step by step. First, we're creating a new class that is generic over the type T so that we can store keypaths of type KeyPath<T, String> in our keyPaths array [1]. Each keypath is stored in a tuple with an optional prefix.
Then, we can initialize a DebugPrinter with a prefix String - which will be printed at the beginning of each future print invocation - and a reference to the actual instance we want to debug T [2].
The addLog function, then, inserts a new KeyPath into our keyPaths array (again, including the optional prefix) [3].
Finally, the log function, when called, iterates over all the keypaths and, for each of them, prints the contents of the KeyPath in our reference (including the prefix).
Before you move on, have a brief look at the implementation of the DebugPrinter and at the usage example. Would this actually work?
No, it actually doesn't. The problem is that our Presentation state has properties of various types: currentSlideIndex: Int, title: String, leftImage: UIImage?. However, our DebugPrinter only stores keypaths of the type KeyPath<T, String>. We could try to make the second parameter generic as well, but that still doesn't help, because it would be generic for the full instance of DebugPrinter, for example:
class DebugPrinter<Root, Value> {

   var keyPaths: [KeyPath<Root, Value>]

}
Here, our KeyPath still have to be of the same type. All Int, all String, etc. What we actually want is a keypath that doesn't care about the Value type! A KeyPath that just cares about the Root type (our reference). This is, what the PartialKeyPath is for. Lets have a look at it.
PartialKeyPath
PartialKeyPath is a type-erased KeyPath that erases the Value type parameter.
As we've seen in the previous chapter, sometimes you want to have a KeyPath that does not require a Value type parameter. That is, what the PartialKeyPath is for. Its type signature is PartialKeyPath<Root>. As you can see, there is no Value type anymore. This KeyPath, again, is read-only. However, it is very useful because it allows you to be much more flexible when storing keypaths in arrays or writing functions that accept keypaths. Here is a quick example:
/// Value would be `String`

let a: PartialKeyPath<User> = \User.name


/// Value would be `Int`

let b: PartialKeyPath<User> = \User.age


/// Value would be `Address`

let c: PartialKeyPath<User> = \User.address
See how these totally different types (KeyPath<User, String>, KeyPath<User, Int>, ...) are actually stored with the same type, just PartialKeyPath<User>. We type-erase the Value parameter.
This is useful because it allows you to call the same function with different types of keypaths:
func acceptKeyPath(_ keyPath: PartialKeyPath<User>) {

   ...

}

acceptKeyPath(\User.age)

acceptKeyPath(\User.username)
More importantly, it allows us to solve the issue we had with the DebugPrinter in the previous code. We can now implement is as follows:
/// Dynamically define a debug description for an object

class DebugPrinter<T> where T: AnyObject {

     var keyPaths: [(String?, PartialKeyPath<T>)] = []

     let reference: T

     let prefix: String


     init(_ prefixString: String, for instance: T) {

         reference = instance

         prefix = prefixString

     }


     func addLog(_ path: PartialKeyPath<T>, prefix: String? = nil) {

         keyPaths.append((prefix, path))

     }


     func log() {

         print(prefix, terminator: \": \")

         for entry in keyPaths {

           if let prefix = entry.0 { print(prefix, terminator: \"\") }

           print(reference[keyPath: entry.1], terminator: \", \")

         }

     }

}
Just by replacing KeyPath<T, String> with PartialKeyPath<T> we could fix the issue with this code, and now it can be used with all types.
Now, you're probably wondering whether there is a KeyPath type that also type-erases the Root type parameter, and in fact, there is! Next up, the appropriately named AnyKeyPath.
AnyKeyPath
The last KeyPath type that we have to tackle is the AnyKeyPath. It doesn't have a type-parameter for either Root or Value as it is completely type-erased. If you read the chapter to PartialKeyPath, you will easily grep this one as well. This type is really useful once you intend to write code that just stores general keypaths from differently typed objects. Here is a small bit of example code:
let keyPaths: [AnyKeyPath] = [

   \User.username,

   \String.count,

   \Presentation.title

]
We will see more (and better!) usecases for this type later on in this guide, however here is a very simple example of where it could be useful.
You're writing a game and you have different entities / types: Animals, Monsters, Players, and Objects. Each of them have a health property (even objects. If you hit a tree long enough, it will break). You need an easy way to debug the health of all entities that are currently on screen. You can just collect them into an array of AnyKeyPath and print them out:
func observeHealth(entity: Any, _ keypath: AnyKeyPath) { ... }

observeHealth(entity: monster1, \Dragon.health)

observeHealth(entity: stone255, \Stone.integrity)

observeHealth(entity: player2, \Player.health)
This tackles the last one of our keypaths. You might have wondered though, what good are those type-erased keypaths given that you can't modify properties. After all they're all read-only! Not necessarily, because Swift allows you to type-cast them at runtime.
Type-Casting KeyPaths
As we've seen before, Swift offers PartialKeyPath<Root> and AnyKeyPath as a way to generalize KeyPath handling. While this makes it easier to store these keypaths in generic functions and arrays, it makes it much harder to actually use them. There's not much we can do with them - except for printing maybe - which is why most of our usage examples were about printing.
Type-casting changes this. It allows you to cast a type-erased KeyPath back into (for example) a WritableKeyPath in a totally type-safe manner. Observe the magic:
let keyPath: AnyKeyPath = \User.username

var user = User(username: \"Hello\")


if let writableUsername = keyPath as? WritableKeyPath<User, String> {

    user[keyPath: writableUsername] = \"World\"

}
In this example, you saw how we converted an AnyKeyPath back into a WritableKeyPath<User, String>. The important part is that as? returns on optional. So if the KeyPath is not of type <User, String> nothing would happen as the expression would return nil. Therefore, in order to work with multiple types (String, Int, Float, etc), you need more than one if statement. Preferrably a switch statement.
In this example, we're using switch to identify the specific type of the keyPath and then perform a different operation depending on the type.
let keyPath: AnyKeyPath = \User.username

switch keyPath {

case let a as KeyPath<Yeah, String>:

     print(\"String\" + xxx[keyPath: a])

case let a as KeyPath<Yeah, Int>:

     print(1 + xxx[keyPath: a])

default:

     print(\"Unknown keypath type\")

}
KeyPath Composition
The last keypath concept that we should tackle is keypath composition: Swift allows you to dynamically combine KeyPath types at runtime if the types match up.
In order to showcase this, we will go back to our User and Address struct:
struct User {

   let address: Address

}


struct Address {

   let street: String

}
Example
Based on this structure, we will take two different keypaths; first, one to the address property on the User, and then one on the String property on the Address:
let addressKeyPath = \User.address


let streetKeyPath = \Address.street
Given these two variables, we can now compose them to manifest a new keypath at runtime that goes from User to the street:
let newKeyPath = addressKeyPath.appending(path: streetKeyPath)
Here, we created a new KeyPath<User, String> at runtime by joining a KeyPath<User, Address> and a KeyPath<Address, String>. However, what should Swift do if you try to merge a KeyPath<User, String> and a KeyPath<House, Int>. Obviously, there's no relationship between these types. Swift solves this by introducing laws of keypath composition. Lets have a look at them.
Laws of composition
Appending type-erased keypaths
There're some additional constraints that need to hold in order to allow joining keypaths. In general, you can combine any type of keypath with any other types, except for the following combinations:
Impossible keypaths combinations
| First | Second |
|---|---|
| KeyPath | AnyKeyPath |
| KeyPath | PartialKeyPath |
| WritableKeyPath | AnyKeyPath |
| WritableKeyPath | PartialKeyPath |
| ReferenceWritableKeyPath | AnyKeyPath |
| ReferenceWritableKeyPath | PartialKeyPath |
This is actually quite easy to remember. You can't append a AnyKeyPath or a PartialKeyPath to a non-type-erased KeyPath type.
The rule is that the KeyPath to be appended has to have at least as many generic types as the type being appended to.
Appending to type-erased keypaths
The second rule is that appending anything to a type-erased keypath will return an optional keypath:
Keypaths combinations returning Optional
| First | Second |
|---|---|
| AnyKeyPath | Anything |
| PartialKeyPath | Anything |
Appending invalid types
The third, and final, rule is that you can't append non-matching types. So, for example appending KeyPath<User, String> and KeyPath<Address, Int> will fail at compile time because the types don't match up.
Generic Settings
Our first practical example showcases how keypaths, protocols, and keypath composition work together to allow you to handle app settings in a generic manner. Here is the problem we're trying to solve, have a look at these different settings screens for our Chat app:

Lets map those settings as a type:
final class ProfileSettings {

   var displayName: String

   var shareUpdates: Bool

}


final class PrivacySettings {

   var passcode: Bool

   var addByID: Bool

}


final class Settings {

   var profileSettings: ProfileSettings

   var privacySettings: PrivacySettings

}
If we want to find a generic abstraction for these settings, it would be very difficult. That's because they're all so very different. Their types are String, Bool, Bool, Bool, and ProfileSettings, PrivacySettings.
Even more, as we expand our settings they will become more and more different.
Lets try to find a nice solution for this by utilizing keypaths.
Settings Entries
Fundamentally, the first thing we need is a way to describe a particular settings entry. It is not sufficient to just know the value of the settings; we also need a title, a subtitle, maybe some help, or an icon. We will summarize this information into a SettingsEntry struct. This struct will also contain a keypath that points at the individual value this setting refers to.
struct SettingsEntry {

   let keyPath: AnyKeyPath

   let title: String

   let subtitle: String

   let icon: UIImage

}
For the sake of simplicity, we will use the following, shorter struct in the upcoming code examples:
struct SettingsEntry {

   let keyPath: AnyKeyPath

   let title: String

}
Note that the type of the keypath is AnyKeyPath. We have to do that because our types can be anything: \Settings.privacySettings, \PrivacySettings.passcode, or \ProfileSettings.displayName.
A Settings Provider
Now that we have our SettingsEntry type, we need a way to provide all the settings entries that make up our UI. This is where protocols are a great solution. We want something that works for our different settings types (Settings, ProfileSettings, PrivacySettings), and protocols are made for just that. Our concrete protocol is defined to provide our applications with the specific settings for a type, so we will call it SettingsProvider.
protocol SettingsProvider {

   var settingsEntries: [SettingsEntry] { get }

}
It is also a fairly simple protocol. The only thing it does is provide a getter to return an array of SettingsEntry types for one of our settings types. Lets implement it:
extension Settings: SettingsProvider {

  var settingsEntries: [SettingsEntry] {

   return [

       SettingsEntry(

           keyPath: \Settings.profileSettings,

             title: \"Profile\"),


       SettingsEntry(

           keyPath: \Settings.privacySettings,

             title: \"Privacy\")

   ]

  }

}
Our first implementation is for our main parent Settings class. It has two properties that we'd like to be displayed in the settings, the Profile Settings and the Privacy Settings, which is why we're returning these two as SettingsEntry types.
Next up, we will implement the SettingsProvider for our ProfileSettings:
extension ProfileSettings: SettingsProvider {

  var settingsEntries: [SettingsEntry] {

   return [

     SettingsEntry(

        keyPath: \ProfileSettings.displayName,

          title: \"Display Name\"),


     SettingsEntry(

        keyPath: \ProfileSettings.shareUpdates,

          title: \"Share Profile Media Updates\")

   ]

  }

}
Again, we return two settingsEntries, because this settings screen should display the Display Name and Share Updates setting. Finally, we obviously also need to implement our SettingsProvider for our PrivacySettings.
extension PrivacySettings: SettingsProvider {

  var settings: [SettingsEntry] {

   return [

     SettingsEntry(

         keyPath: \PrivacySettings.addByID,

           title: \"Allow add me by ID\"),


     SettingsEntry(

         keyPath: \PrivacySettings.passcode,

           title: \"Passcode Lock\")

   ]

  }

}
No surprises here.
Handling the Settings
The next part is crucial. What do we intend to do with these settings? The natural way would be to build a UI that displays them and allows the user to edit them. Another option would be to set settings to specific values. All of these things are possible. We will do something slightly simpler which still explains the basics of the code without requiring us to write a lot of UI code. In this example, we will iterate over the settings, print out their title and value, and will then change the value to true if it is Bool. However, as mentioned above, you can use the very same pattern to display these settings in a very nice UI.
The first thing we need is a function we can call with our settings. This function needs to be generic. We should be able to call it with any type. To do this, it will only have one argument of the SettingsProvider type. However, later on, we will also need the specific type that implements the protocol, which is why we code this in a generic manner:
func editSettings<Provider: SettingsProvider>(provider: Provider) {

   ...

}


/// And lets call it

let appSettings = Settings()

editSettings(appSettings)
Since our SettingsProvider only really offers one property, the settingsEntries we will iterate over them:
func editSettings<Provider: SettingsProvider>(provider: Provider) {

   for setting in provider.settingsEntries {


   }

}
Remember how we created settings entries for nested settings, such as ProfileSettings as well as the actual settings values, such as PrivacySettings.passcode? In this case, we have to disambigiuate, do we have an actual value that we want to print and edit, or do we have another, nested, settings provider? To do this, we will get the value of the current KeyPath from the Provider:
func editSettings<Provider: SettingsProvider>(provider: Provider) {

   for setting in provider.settingsEntries {

     let value = provider[keyPath: setting.keyPath]

   }

}
Here, we tell Swift to give us the value in the current SettingsProvider at the KeyPath setting.keypath. This doesn't really solve our problem, though. This value could still be a Bool type or a PrivacySettings type. We can't check whether the type is PrivacySettings because we want to be generic, work with any type. However, since all nested settings also have to implement the SettingsProvider protocol, we can simply test for this:
func editSettings<Provider: SettingsProvider>(provider: Provider) {

   for setting in provider.settingsEntries {

     let value = provider[keyPath: setting.keyPath]

     if let nestedProvider = value as? SettingsProvider {

     }

   }

}
Via the value as? SettingsProvider we're just asking Swift at runtime whether the value is actually a type we want to handle (such as Bool, or String) or another nested SettingsProvider that we'd like to iterate over. Which is precisely what we will do next, iterate over the provider again. However, since we may have another settings provider, and then another one, we would need to write more and more for loops:
   for setting in provider.settingsEntries {

     let value = provider[keyPath: setting.keyPath]

     if let nestedProvider = value as? SettingsProvider {

       for nestedSetting in nestedProvider.settingsEntries {

         let value = provider[keyPath: nestedSetting.keyPath]

         if let nestedNestedProvider = value as? SettingsProvider {

           for nestedNestedSetting in nestedNestedProvider.settingsEntries {

           ...

           }

         }

       }

     }

   }
This is truly terrible. Instead, we will move this iteration code into a inlined function updateSetting that can be called recursively. So, whenever we identify another nested provider, we will simply call the function again:
func editSettings<Provider: SettingsProvider>(provider: Provider) {

   // All subsequent iterations happen here

   func updateSetting(keyPath: AnyKeyPath, title: String) {

     let value = provider[keyPath: keyPath]

     if let nestedProvider = value as? SettingsProvider {

       for item in nestedProvider.settings {

         // ??

       }

     }

   }


   // The initial iteration

   for setting in provider.settingsEntries {

     updateSetting(keyPath: setting.keyPath, title: setting.title)

   }

}
Here, we moved the iteration code into its own function. It has two parameters, the keyPath of the value we want to test, and the title of the current setting. The keypath helps us to extract the value:
let value = provider[keyPath: keyPath]
The value is then tested for being another SettingsProvider:
if let nestedProvider = value as? SettingsProvider {

  ...

}
But what do we do now? In the first step, here, the keyPath would be \Settings.profileSettings and the value will be ProfileSettings.
But what do we do now? If we iterate over the ProfileSettings as a SettingsProvider we get two new SettingsEntries, one for displayName, and one for shareUpdates. However, our updateSetting function always calls let value = provider[keyPath: keyPath] on the original provider, the Settings class that was given as a parameter to the editSettings function. This makes sense, because we want to edit the contents of this Settings type.
So we have a keypath to \Setting.profileSettings and a keypath to \ProfileSettings.displayName and we want to retrieve the value at \Setting.profileSettings.displayName. We can use Swift's KeyPath composition!
func editSettings<Provider: SettingsProvider>(provider: Provider) {

   // All subsequent iterations happen here

   func updateSetting(keyPath: AnyKeyPath, title: String) {

     let value = provider[keyPath: keyPath]

     if let nestedProvider = value as? SettingsProvider {

       for item in nestedProvider.settings {

         // Join the keypaths

         if let joined = keyPath.appending(path: item.keyPath) {

           updateSetting(keyPath: joined, title: item.title)

         }

       }

     }

   }


   // The initial iteration

   for setting in provider.settingsEntries {

     updateSetting(keyPath: setting.keyPath, title: setting.title)

   }

}
In the code above, the magic happens in the following three lines:
if let joined = keyPath.appending(path: item.keyPath) {

   updateSetting(keyPath: joined, title: item.title)

}
We take the original keyPath that was given to the updateSettings function first (i.e. \Setting.profileSettings) and we take the item.keyPath, which is the keypath of the current item (i.e. \ProfileSettings.displayName) and join them to \Setting.profileSettings.displayName. Now we can use this joined keypath to retrieve the value of the displayName property of the provider instance and perform another iteration. By implementing it this way, we can easily support more nesting hierachies.
So what happens when our value isn't another nested SettingsProvider but an actual value such as String or Bool (displayName or shareUpdates). Since we want to be able to change the value that is stored here (from false to true) we do a run-time cast from this keyPath to a WritableKeyPath to figure out if we have an editable value.
if let writableKeypath = keyPath as? WritableKeyPath<???, ???> {

}
However, WritableKeyPath needs two types, the Root and the Value, what do we insert here? We don't know the type of the Root as we're iterating over Settings, ProfileSettings, PrivacySettings, etc, right? It could be anything. Actually, we do know the type of Root. Since our keypaths are joined (\Settings.profileSettings.displayName) our root is always Settings. So we could write WritableKeyPath<Settings, ???> but now our function would not be generic anymore. If we look at the header of our original function, though, we see something interesting:
func editSettings<Provider: SettingsProvider>(provider: Provider) {

...
We actually do have our root type, as the Provider generic type to the editSettings function. So we can just write WritableKeyPath<Provider, ???>. The second type of our WritableKeyPath is also easy. If we want to edit boolean flags, it is Bool, and if we want to edit Strings it is .. well, String. Lets type this out:
func editSettings<Provider: SettingsProvider>(provider: Provider) {

   // All subsequent iterations happen here

   func updateSetting(keyPath: AnyKeyPath, title: String) {

     let value = provider[keyPath: keyPath]

     if let nestedProvider = value as? SettingsProvider {

       for item in nestedProvider.settings {

         if let joined = keyPath.appending(path: item.keyPath) {

           updateSetting(keyPath: joined, title: item.title)

         }

       }

     } else if let writable = keyPath as? WritableKeyPath<Provider, Bool> {

       print(title)

       provider[keyPath: writable] = true

     }

   }


   // The initial iteration

   for setting in provider.settingsEntries {

     updateSetting(keyPath: setting.keyPath, title: setting.title)

   }

}
That's it! We cast the keypath to a writable variant, and then we can modify the contents of our Settings type (or nested types). Everything happens in these additional lines of code:
if let writable = keyPath as? WritableKeyPath<Provider, Bool> {

       print(title)

       provider[keyPath: writable] = true

     }

}
Subsequently, we could easily extend these lines to also query for WritableKeyPath<Provider, String> or WritableKeyPath<Provider, Double>, etc.
This is our final function. It allows us to handle app settings in a completely generic manner. It iterates over them, it can display them (we did not see that because the code size would have exploded), and it can edit them. Without ever knowing the actual shape of the settings type. It can also be used for structures other than settings. Any complex type can be iterated in this manner.
However, this was only a small example of what you can do with keypaths. There is even more! Lets have a look.
Three tips for using KeyPaths
This chapter will highlight a couple of very useful tricks that you can keep in mind writing code in order to identify situations where keypaths are helpful.
1. Erase Types
We already saw this, but it is worth mentioning again. One reason why keypaths are so useful is because there're type-erased variants. As we saw in our practical example, the ability to temporarily go to AnyKeyPath offers many more opportunities. So, always remember these types:
KeyPath<A, B> = \User.age

PartialKeyPath<A> = \User.age

AnyKeyPath = \User.age
2. Cast Types Back
This is the opposite of what we just did. Instead of removing types, we're adding types back:
AnyKeyPath as? WritableKeyPath<User, String>

PartialKeyPath<User> as? KeyPath<User, Bool>
Sometimes you might need to add generics in order to keep the necessary types around to perform the correct casting. An example of this was how we wrote
func editSettings<Provider: SettingsProvider>(provider: Provider)
instead of the simpler:
func editSettings(provider: SettingsProvider)
The second version would work just as fine, but it would not allow us to use Provider as the Root type in our WritableKeyPath<Provider, Bool> cast.
3. KeyPaths conform to Hashable
We did not see an example of this yet, but it is one of my all-time favorite keypaths functions. Every KeyPath type is Hashable which means that it can be used as a key in a dictionary. One use case for this is storing meta information about properties in a dictionary. Here, we have a dictionary that maps from partial key paths to String. It stores two different keypaths (username, age) and their titles:
let meta: [PartialKeyPath<User>: String] = [

   \User.username: \"Your Username\",

   \User.age: \"Your Age\"

]
We can now write a function renderTitle that will retrieve this meta information and print it out alongside the actual value:
func renderTitle(on: User, keyPath: AnyKeyPath) {

   if let title = meta[keyPath] {

     print(title, terminator: \": \")

   }

   print(on[keyPath: keyPath])

}


let myUser = User(username: \"Jon\", age: 44)


renderTitle(on: myUser, keyPath: \User.age)
This would print Your Age: 44
This pattern can be used for many more situations. Whenever you have information about a type, you can utilize it to store the information. Another example would be input validation.
Conclusion
We've seen how the Swift KeyPath type can be used to define abstractions that would otherwise not be possible with just protocols or generics. As with everything in Swift, the beauty is how you can combine the different patterns, be it KeyPath, or protocol, or generics and use them to solve problems in new and exciting kind of ways. With each release, Swift introduces more and better features that help us do this. KeyPaths are one of those nice additions that simplify development in many ways.
| Similar Articles |
|---|